|
Air Tank Installation:
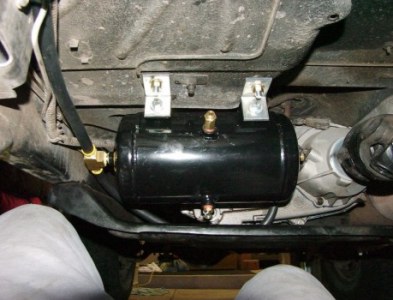
 Here is a shot of my air tank. (taken from the rear of the Jeep looking forward) Note the pressure relief valve in the center and the drain valve on the bottom of the tank. I selected the 1.25 cu. ft. model because it was the smallest. Now, I know that here the old adage "the bigger the better" applies, the issue for me is that I don't want my jeep turned into a traveling garage, even though that too has its merits. I just want air for my tires (quick) and if I want to run air tools, I want to be able to do that even if I am a little limited with the smaller tank. Part of the consideration also included the mounting location and I didn't want to compromise any clearance whatsoever. So, the 1.25 fit sideways just under the center transfer case skid plate. I used double nuts on the bolts so that I don't have to worry about them turning should I need to remove the air tank to service the transfer case. Also, I left additional hose so that I can remove the tank and set it aside and still remove the transfer case for service without having to cut the hose and re-install the hose on the tank. I did the same in the rear of the Jeep (left additional hose) where I installed the quick disconnect on the rear bumper. Here is a shot of my air tank. (taken from the rear of the Jeep looking forward) Note the pressure relief valve in the center and the drain valve on the bottom of the tank. I selected the 1.25 cu. ft. model because it was the smallest. Now, I know that here the old adage "the bigger the better" applies, the issue for me is that I don't want my jeep turned into a traveling garage, even though that too has its merits. I just want air for my tires (quick) and if I want to run air tools, I want to be able to do that even if I am a little limited with the smaller tank. Part of the consideration also included the mounting location and I didn't want to compromise any clearance whatsoever. So, the 1.25 fit sideways just under the center transfer case skid plate. I used double nuts on the bolts so that I don't have to worry about them turning should I need to remove the air tank to service the transfer case. Also, I left additional hose so that I can remove the tank and set it aside and still remove the transfer case for service without having to cut the hose and re-install the hose on the tank. I did the same in the rear of the Jeep (left additional hose) where I installed the quick disconnect on the rear bumper.
|
| Quick Disconnect Installation & Location:
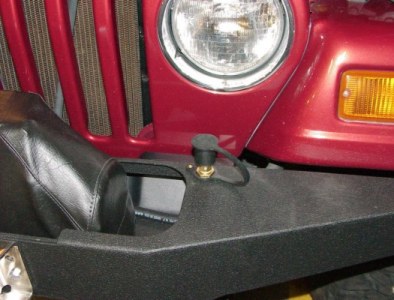
 Here is a picture of the front quick disconnect with a rubber cap to keep out dirt and debris. Installation with the Kilby bulkhead fitting requires that you drill a 3/4 inch hole (with a steel cutting hole saw purchased at, where else, Home Depot) Here is a picture of the front quick disconnect with a rubber cap to keep out dirt and debris. Installation with the Kilby bulkhead fitting requires that you drill a 3/4 inch hole (with a steel cutting hole saw purchased at, where else, Home Depot)
The rear installation of the quick disconnect is very similar even though I didn't provide a picture of that.
|

 Here is a shot of my air tank. (taken from the rear of the Jeep looking forward) Note the pressure relief valve in the center and the drain valve on the bottom of the tank. I selected the 1.25 cu. ft. model because it was the smallest. Now, I know that here the old adage "the bigger the better" applies, the issue for me is that I don't want my jeep turned into a traveling garage, even though that too has its merits. I just want air for my tires (quick) and if I want to run air tools, I want to be able to do that even if I am a little limited with the smaller tank. Part of the consideration also included the mounting location and I didn't want to compromise any clearance whatsoever. So, the 1.25 fit sideways just under the center transfer case skid plate. I used double nuts on the bolts so that I don't have to worry about them turning should I need to remove the air tank to service the transfer case. Also, I left additional hose so that I can remove the tank and set it aside and still remove the transfer case for service without having to cut the hose and re-install the hose on the tank. I did the same in the rear of the Jeep (left additional hose) where I installed the quick disconnect on the rear bumper.
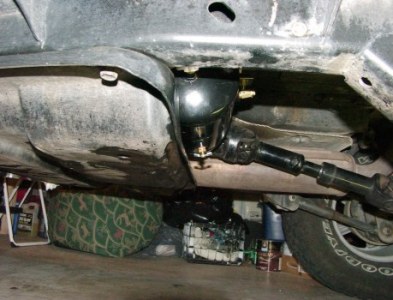
 Here's a side shot of the tank taken from the driver's side. You can see that it is tucked up and out of the way of any potential rocky obstacles.
  Here is a picture of the front quick disconnect with a rubber cap to keep out dirt and debris. Installation with the Kilby bulkhead fitting requires that you drill a 3/4 inch hole (with a steel cutting hole saw purchased at, where else, Home Depot)